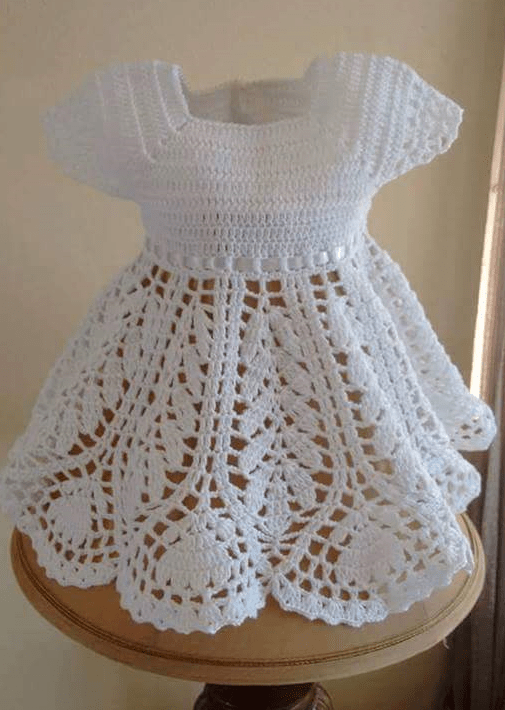
The crochet baby dress you will see can result in many other ideas as it is worth changing the color of the dress or incorporating more details, for example. Check out this idea of children’s crochet dress and create amazing pieces that will make your customers delighted and their daughters even more beautiful, if you are already a known and experienced crochet that sells many products. Let’s go to the free tutorial we prepared to you then?
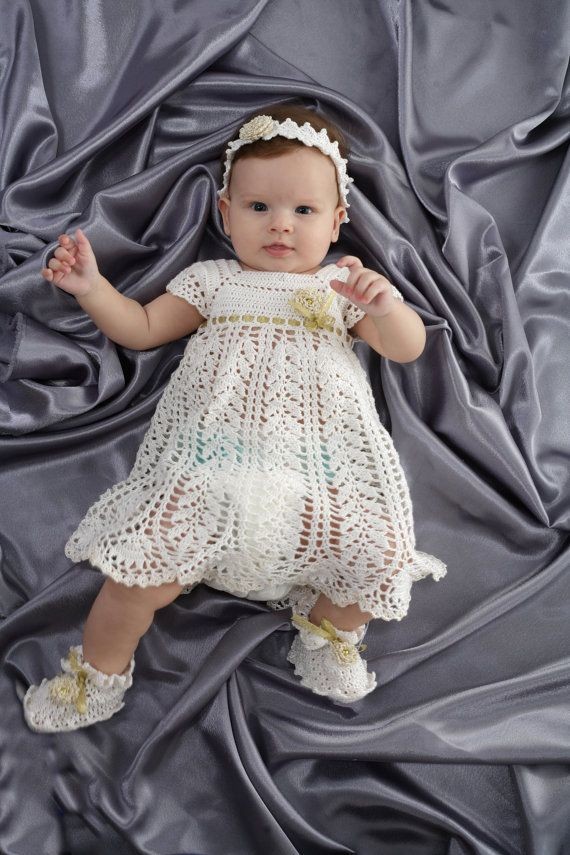
Enhance each little crochet dress with stones, ribbons and flowers and get even more customers. If you, like me, can’t resist looking at a children’s crochet dress, the post will make you fall in love with this model we have separated.

The look that is all handmade is undoubtedly a grace for the little girls, and with inspiration you can create various styles of pieces to make the little girl even more beautiful with a special and delicate touch. Summer is soon to come, and for you to wait for the new season in fashion, how about getting inspired by this post full of beautiful ideas and making a crochet dress for your daughter?
Crochet children’s dresses are beautiful, charming, delicate and will not let your little girl get warm and she will be comfortable because they are comfortable. In addition, because it is a handmade piece, the crochet dress brings delicacy and romanticism to the look. This craft that is passed from generation to generation conveys to the piece something that goes far beyond the clothing itself.
Materials used : Today I’ve used ~ 185 gms of our lovely Indian Oswal Cashmilon 4-ply acrylic yarn with a 3.5 mm crochet hook ;
Optional : Stitch marker
Size made : For a 2 yr old
Difficulty level : Intermediate Skill level
fsc : Foundation single crochet
ch : Chain
dc : Double crochet sp(s) : Space(s)
st(s) : Stitch(es) hk : Hook
lp : Loop(s) yo : Yarn Over
sk : Skip sc : Single crochet
Start Row 1 : with fsc for the number of stitches per chart (i.e according to the yoke size you’re making). Turn.
Place markers for the four corners of your yoke.
By the chart that we’re referring to now (say for the 18 – 24 m), we will count off 10 sts and place a maker for 1st corner, then count off 13 sts and place the 2nd marker, then count of 20 sts and place the 3rd marker, and finally count off 13 sts and place the 4th last marker.
We also have a “V”-st for this part of the yoke which is (dc ; ch 1, dc) all in the same st or ch-sp
Row 2 : dc in the 1st fsc and in each fsc till the 1st marker ;
“V”-st in the marked st ;
*dc in each fsc till the next marker ; “V”-st in the marked st* ;
rep *to* 2 times till end. Turn.
Before we move any further, a quick note. You need to decide how much of an opening you need for your buttons at the back. Depending on how deep that is, you will work back and forth in rows. Once you have a button placket that you’re happy with, then you will just join with a sl-st at that last st, and work in rounds thereafter.
For little babies, and younger kids, you will work a longer button placket so that we can ease the dress past the babies’ head properly.
Row 3 : dc in the 1st dc and in each dc till kthe 1st ch-1 sp ;
“V”-st in the same ch-1 sp ;
*dc in each dc till the next ch-1 sp ; “V”-st in the next ch-1 sp* ;
rep *to* 2 times till end. Turn.
Rep Row 3 till we have the yoke size we need.
So what’s our yoke size? It’s right there on the chart. So the top part of the chart shows you the number of stitches needed, and the lower part is the folded over yoke, and it has the length of shoulder and length from shoulder to base of yoke. So work according to the sizing you’re creating, and we’ll meet in a bit for the skirt part of the yoke.
I suggest that we work the skirt portion of our dress in rounds. So on that last row for the yoke, go ahead and join the two ends so that we have a neat round to work on.
SLEEVELESS
Re-attach your yarn at the armhole and let’s run a round of sc all around, in multiples of 3. Join with a sl-st to the 1st st.
Round 1 : sc in the 1st sc ; *ch 3, sk next sc, sc in the next sc* ;
rep *to* all around till the last 2 sc ;
ch 1, sk next sc and join with a hdc to the 1st sc.
You are now in the centre of that last ch-3 sp.
Round 2 : sc in the 1st ch-3 sp ;
*ch 3, sc in the next ch-3 sp* ;
rep *to* all around till the last ch-sp ; ch 1, and join with a hdc to the 1st sc.
You are now in the centre of that last ch-3 sp.
Rounds 3 – 5 : Rep Round 2.
Round 6 : sc in the 1st ch-3 sp ;
*5 dc in the next ch-3 sp ; sc in the next ch-3 sp* ;
rep *to* all around and join with a sl-st to the 1st sc.
Fasten off and weave in ends.
NECKLINE
Re-attach your yarn at the neckline and let’s run a round of sc all around, in multiples of 3. Join with a sl-st to the 1st st.
Round 1 : sc in the 1st sc ;
*ch 3, sk next sc, sc in the next sc* ;
rep *to* all around till the last 2 sc ; ch 1, sk next sc and join with a hdc to the 1st sc.
You are now in the centre of that last ch-3 sp.
Round 2 : sc in the 1st ch-3 sp ;
*ch 3, sc in the next ch-3 sp* ;
rep *to* all around till the last ch-sp ; ch 1, and join with a hdc to the 1st sc.
You are now in the centre of that last ch-3 sp.
Round 3 : sc in the 1st ch-3 sp ;
*5 dc in the next ch-3 sp ; sc in the next ch-3 sp* ;
rep *to* all around and join with a sl-st to the 1st sc.
Fasten off and weave in ends.
SKIRT
Round 1 : dc in the 1st 2 dc ;
*ch 2, sk next 2 dc , dc in the next dc ; ch 2, sk next 2 dc, dc in the next 4 dc* ;
rep *to* all around, ending with dc in the last 2 dc.
Join with a sl-st to the 1st st.
Round 2 : dc in the 1st 2 dc ;
*ch 2, (dc in the next dc ; ch 1, dc in the same dc) ; ch 2, dc in the next 4 dc* ;
rep *to* all around, ending with dc in the last 2 dc.
Join with a sl-st to the 1st st.
Round 3 : dc in the 1st 2 dc ;
*ch 2, (3 dc in the next dc ; ch 1, 3 dc in the next dc) ; ch 2, dc in the next 4 dc* ;
rep *to* all around, ending with dc in the last 2 dc.
Join with a sl-st to the 1st st.
Round 4 : dc in the 1st 2 dc ;
*ch 2, (2 dc in the next dc ; dc in the next dc ; 2 dc in the next dc) ;
ch 1, dc in the next ch-1 sp ; ch 1, rep (to) once ; ch 2, dc in the next 4 dc* ;
rep *to* all around, ending with dc in the last 2 dc.
Join with a sl-st to the 1st st.
In our next round, we will start the next set of leaves, so see how this beautifully branches out.
Round 5 : dc in the 1st 2 dc ;
*ch 2, (dc in the next 5 dc ; [ch 1 dc in the next dc ; ch 1, dc in the same dc] ; dc in the next 5 dc) ; ch 2, dc in the next 4 dc* ;
rep *to* all around, ending with dc in the last 2 dc.
Join with a sl-st to the 1st st.
Round 6 : dc in the 1st 2 dc ;
*ch 2, (sk next dc, dc in the next 3 dc ; [ch 2 , sk next dc , 3 dc in the next dc ; ch 1, 3 dc in the next dc] ; ch 2, sk next dc, dc in the next 3 dc) ; ch 2, sk next dc , dc in the next 4 dc* ;
rep *to* all around, ending with dc in the last 2 dc.
Join with a sl-st to the 1st st.
Round 7 : dc in the 1st 2 dc ;
*ch 3, (sk next dc, dc in the next dc ; ch 2 , sk next dc , [2 dc in the next dc ; dc in the next dc ; 2 dc in the next dc] ; ch 1, dc in the next ch-1 sp ; ch 1, rep [to] once ; ch 2, sk next dc, dc in the next dc) ; ch 3, sk next dc , dc in the next 4 dc* ;
rep *to* all around, ending with dc in the last 2 dc.
Join with a sl-st to the 1st st.
Round 8 : dc in the 1st 2 dc ;
*ch 3, (dc in the next dc ; ch 2 , dc in the next 5 dc ; [ch 2, dc in the next dc ; ch 1, dc in the same dc] ; ch 2, dc in the next 5 dc) ; ch 2, dc in the next dc ; ch 3, dc in the next 4 dc* ;
rep *to* all around, ending with dc in the last 2 dc.
Join with a sl-st to the 1st st.
Just for a moment, put your work down to admire what we’ve created and also to see how the leaves are emerging.
See how we’ve completed one full leaf bit and are halfway through the next one.
The following round is a rep of Round 6, but we will be ignoring that 1st dc which forms the end of the last leaf, so a small difference in the instructions.
Round 9 : dc in the 1st 2 dc ;
*ch 3, (sk next 2 dc, dc in the next 3 dc ; [ch 2 , sk next dc , 3 dc in the next dc ; ch 1, 3 dc in the next dc] ; ch 2, sk next dc, dc in the next 3 dc) ; ch 3, sk next 2 dc , dc in the next 4 dc* ;
rep *to* all around, ending with dc in the last 2 dc.
Join with a sl-st to the 1st st.
Are you enjoying it? Also check out these Free Patterns:
➥ Baby Girl’s Lacy Crocheted Sundress
➥ Stunning Bumble Bee Dress Tutorial