Crochet Chevron Stripe Bag Tutorial
This pattern is for a similar-style bag using the classic crochet chevron stitch. You will work the main body flat, and then seam the sides.
Materials Needed
-
Yarn: Medium-weight (Worsted/Aran) cotton or a sturdy yarn like cotton-blended macramé cord or t-shirt yarn for structure. Use a variety of colors to achieve the striped look (minimum 3-5 colors).
-
Hook: Appropriate size for your yarn (usually H-8 / 5.0 mm or J-10 / 6.0 mm).
-
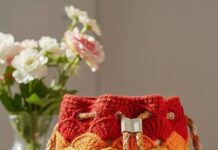
Accessories: Wooden or plastic round handles (as seen in the picture), Scissors, Tapestry needle for weaving in ends.
Skill Level: Intermediate
You should be comfortable with basic stitches, working into chain spaces, and increasing/decreasing.
Abbreviations (US Terms)
| Abbreviation | Stitch Name |
| ch | chain |
| st | stitch |
| sc | single crochet |
| dc | double crochet |
| sk | skip |
| sp | space |
| dc2tog | double crochet 2 stitches together (decrease) |
The Chevron (Ripple) Stitch Pattern
The pattern is based on creating “peaks” (increases) and “valleys” (decreases) in the row.
-
Valley (Decrease): The lowest point of the zig-zag. You will use a dc2tog here.
-
Peak (Increase): The highest point of the zig-zag. You will use 3 dc in the same stitch/space here.
Pattern Instructions
Step 1: The Foundation Chain
-
Using Color A, ch a multiple of 12 + 3 (The 3 chains are for the turning chain).
-
Example for a medium bag: ch 99 (8 x 12 = 96, plus 3). This is the width of your bag.
-
Step 2: Working Row 1 (Starting Row)
-
Ch 3 (counts as first dc).
-
Dc2tog in the 4th and 5th ch from hook (this creates your first valley/decrease).
-
Dc in the next 4 stitches.
-
3 dc in the next stitch (this is your first peak/increase).
-
Repeat the following across the row:
-
Dc in the next 5 stitches.
-
Dc2tog over the next 2 stitches (valley).
-
Dc in the next 5 stitches.
-
3 dc in the next stitch (peak).
-
-
End the row: Repeat the sequence until you have 7 stitches left.
-
Dc in the next 4 stitches.
-
Dc2tog over the last 2 stitches.
-
Turn your work.
-
Step 3: Working Rows 2 and Subsequent Rows
-
Ch 3 (counts as first dc).
-
Dc2tog in the next 2 stitches (the decrease is worked over the previous row’s decrease).
-
Dc in the next 5 stitches.
-
3 dc in the top of the center dc of the previous row’s 3 dc peak.
-
Repeat the following across the row:
-
Dc in the next 5 stitches.
-
Dc2tog over the next 2 stitches (valley, worked over the previous row’s decrease).
-
Dc in the next 5 stitches.
-
3 dc in the top of the center dc of the previous row’s 3 dc peak.
-
-
End the row: Repeat the sequence until 3 stitches are left.
-
Dc in the next stitch.
-
Dc2tog over the next 2 stitches (worked over the last stitch and the turning chain of the previous row).
-
Turn your work.
-
Step 4: Changing Colors
-
Change colors every 1, 2, or 3 rows for a striped effect. The image shows a different color in every single row.
-
To change color: Complete the last dc of the row up until the final yarn over. Drop the current color, pick up the new color, and pull it through the final two loops on your hook to complete the stitch. Carry or cut the previous color.
Step 5: Continue the Body
-
Repeat Row 2 and Step 4 until the piece is long enough to fold into the desired bag size (it should be approximately double the final height).
-
Fasten off and weave in all ends securely.
Assembly & Finishing
1. Shape the Bag
-
Lay the long crocheted rectangle flat.
-
Fold it in half, matching the starting chain edge to the final row edge (or fold it with the final row meeting a point about 1/3 of the way down for a folded flap).
-
The side edges now form the sides of your bag.
2. Seam the Sides
-
Using a tapestry needle and yarn of a coordinating color (or slip stitch/sc), sew or crochet the side edges together from the bottom fold up to the desired opening height.
-
Turn the bag right-side out.
3. Attach the Handles
-
The image shows a round wooden handle. To attach it, fold the top edge of the bag fabric over the wooden ring (about 1-2 inches) on both the front and back sides.
-
Using a needle and thread/yarn, hand-sew the folded fabric securely around the ring. Ensure the sewing is strong enough to hold the weight of the bag contents.
4. Tassel/Drawstring (Optional)
-
Create multiple strands of yarn in various colors.
-
Fold them in half to create a loop at the top and a tassel at the bottom. Secure the loop with a knot.
-
Attach these tassels/keychains to the side of the bag near the handle for the finishing touch seen in the picture.


")