
Quilting is a beloved art form that allows for creative expression through fabric and thread.
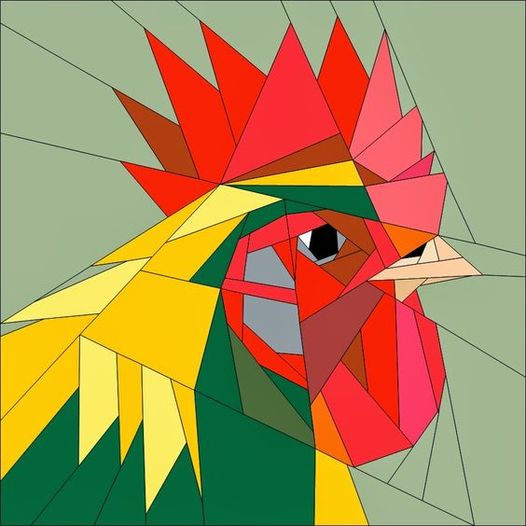
Among the many quilt patterns available, the Rooster Quilt stands out for its vibrant colors and intricate design.
In this tutorial, we’ll walk you through the steps to create your own Rooster Quilt, using a free pattern.
This guide is perfect for both beginners and seasoned quilters looking to add a lively touch to their collection.
Understanding the Rooster Quilt Pattern
Before diving into the process, it’s essential to understand the design elements of the Rooster Quilt.
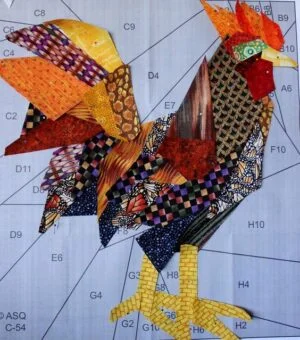
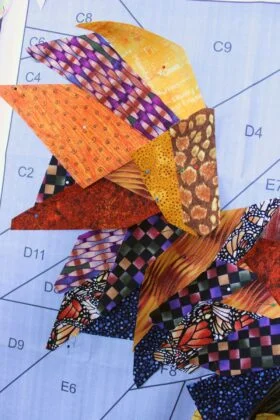
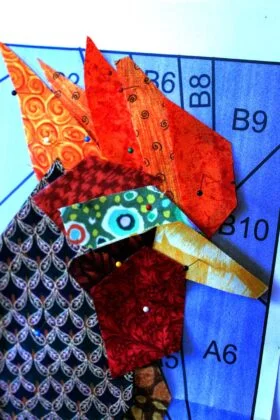
This pattern typically features a rooster as the central motif, surrounded by various quilt blocks that complement its color scheme and theme.
The rooster’s body is often created using a mix of vibrant fabrics, which can include reds, oranges, yellows, and even blues or greens for a striking contrast.
The Rooster Quilt is not just about the rooster itself; the surrounding quilt blocks play a significant role in enhancing the overall design.
These blocks can range from simple squares and triangles to more complex shapes, depending on your quilting experience.
The key is to choose fabrics that harmonize with the rooster, creating a cohesive and visually appealing quilt.
When selecting fabrics for your Rooster Quilt, consider using a combination of solid colors and patterned fabrics.
This mix adds depth and texture to your quilt, making the rooster stand out even more.
Additionally, think about the background fabric—neutral tones like white, beige, or light gray often work best to highlight the colorful rooster and its surrounding blocks.
Gathering Your Materials and Tools
Creating a Rooster Quilt requires specific materials and tools to ensure your project goes smoothly.
Here’s a list of what you’ll need:
- Fabrics: You’ll need several fabric pieces for the rooster, background, and border. Choose vibrant colors for the rooster and complementary patterns for the surrounding blocks. A total of 2 yards of fabric should be sufficient, depending on the quilt size.
- Cutting Tools: A rotary cutter, self-healing mat, and quilting ruler are essential for accurate cutting. These tools will help you cut precise shapes and ensure all pieces fit together seamlessly.
- Sewing Supplies: A sewing machine with a quarter-inch foot is ideal for quilting. Additionally, you’ll need quilting pins, thread that matches your fabrics, and a seam ripper for any adjustments.
Before you start cutting your fabric, ensure you have all these materials on hand.
Proper preparation is key to a successful quilting project.
Also, don’t forget to prewash your fabrics to prevent any shrinkage after the quilt is assembled and quilted.
Step-by-Step Guide to Cutting Your Fabrics
The cutting process is one of the most crucial steps in quilting.
Accurate cutting ensures that all your pieces fit together perfectly, making the assembly process much smoother.
Here’s a breakdown of how to cut the fabric for your Rooster Quilt:
- Cutting the Rooster Pieces: Start by cutting out the pieces for the rooster. You’ll need fabric for the body, wings, tail, and comb. For a standard-sized quilt, cut the body piece to 10 inches by 12 inches, the wings to 4 inches by 6 inches, the tail to 6 inches by 8 inches, and the comb to 2 inches by 3 inches.
- Cutting the Background Fabric: The background pieces will surround the rooster. Cut four pieces of 6 inches by 6 inches for the corners and two pieces of 6 inches by 12 inches for the sides. These pieces will frame the rooster, making it the focal point of the quilt.
- Cutting the Border Fabric: The border adds a finishing touch to the quilt. Cut strips of 4 inches by the length of the quilt (approximately 40 inches). You’ll need four strips—two for the sides and two for the top and bottom.
After cutting all your pieces, label them accordingly to avoid any mix-up during assembly.
This step is particularly important when working with multiple fabric patterns and colors.
Assembling the Rooster Quilt
Once your fabric pieces are cut, it’s time to assemble your quilt.
Follow these steps to bring your Rooster Quilt to life:
- Sewing the Rooster: Begin by sewing the rooster pieces together. Attach the wings to the body, then sew the tail and comb in place. Use a quarter-inch seam allowance for all seams. Press the seams open with an iron to reduce bulk.
- Adding the Background Blocks: Next, sew the background blocks to the rooster piece. Start by attaching the smaller corner blocks, followed by the side pieces. This step will frame the rooster, making it the centerpiece of your quilt.
- Attaching the Border: Finally, add the border strips. Sew the side strips first, then the top and bottom strips. Ensure that the borders are evenly aligned for a neat finish. Once the borders are attached, press the entire quilt top to remove any wrinkles.
With the quilt top assembled, your Rooster Quilt is starting to take shape.
The next steps involve quilting and binding, which will complete your project.
Quilting and Binding Your Rooster Quilt
Quilting and binding are the final steps in the quilt-making process.
These steps add texture and durability to your quilt, ensuring it will last for years to come.
- Quilting the Layers: Lay your quilt top on a flat surface, then place the batting and backing fabric underneath. Pin all three layers together with quilting pins. Using a quilting foot, sew along the seams of the quilt blocks, or create a custom quilting design that complements the rooster pattern.
- Trimming the Excess Fabric: After quilting, trim any excess fabric and batting from the edges. This step ensures that the quilt edges are even and ready for binding.
- Binding the Quilt: To bind the quilt, cut binding strips from your border fabric, each 2.5 inches wide. Fold the strips in half lengthwise and press with an iron. Attach the binding to the quilt edges, sewing it in place with a quarter-inch seam allowance. Fold the binding over the edge and hand-stitch it to the back of the quilt for a clean finish.
Your Rooster Quilt is now complete! After binding, give your quilt one final press with the iron and it’s ready to be displayed or gifted.


