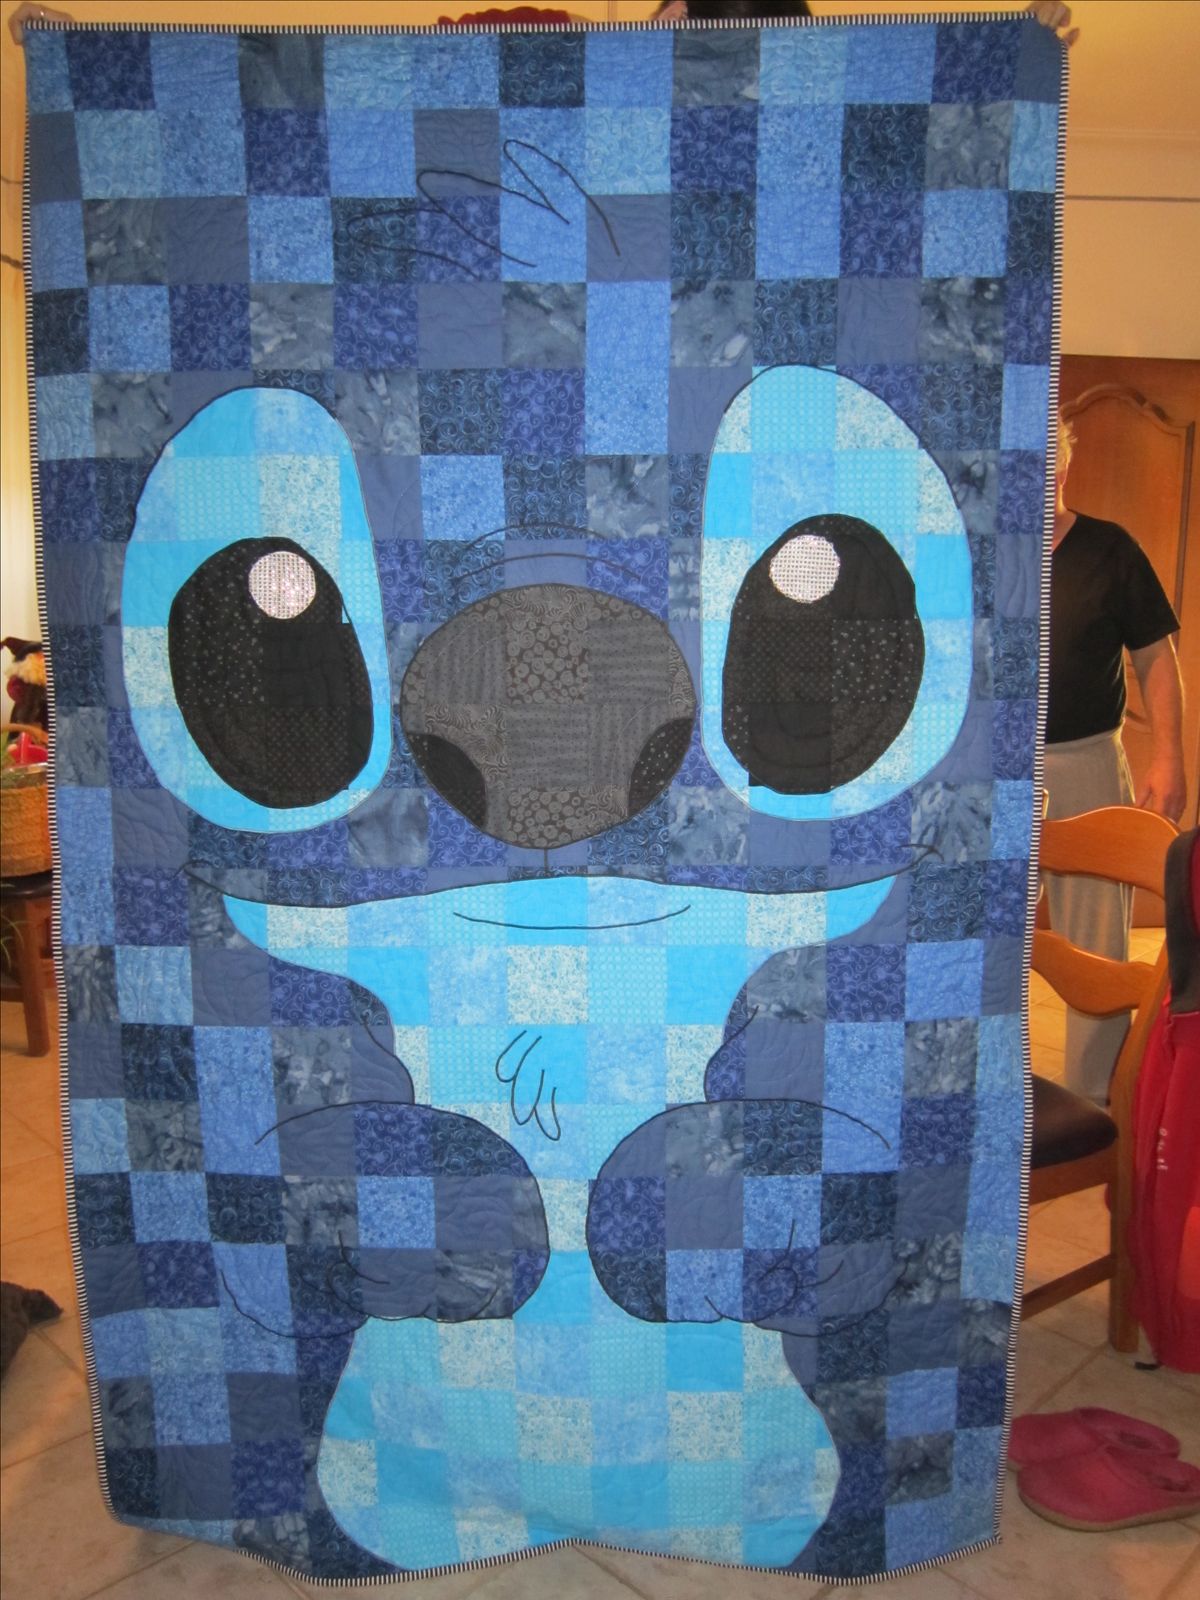
This unique Stitch quilt is a clever combination of two classic quilting techniques: a scrappy checkerboard patchwork background and multi-layered raw-edge fusible appliqué for Stitch’s face and body.
Here is a complete, highly scannable, and professional step-by-step tutorial written in English. It is formatted and optimized specifically for you to copy, adapt, and publish directly on your crafts website to inspire your readers!
DIY Stitch Patchwork & Appliqué Quilt: Step-by-Step Tutorial
If you love Disney’s adorable blue alien, this Stitch Patchwork & Appliqué Quilt is the ultimate weekend project! By combining a simple checkerboard background with easy fusible appliqué, you can bring Stitch to life with incredible depth and texture.
This tutorial will guide you through the process, from selecting your fabrics to adding the final quilted details.
Materials & Tools Needed
To make this quilt, you will need:
- Background Fabrics: A variety of medium, dark, and royal blue cotton fabrics (solids, batiks, and subtle prints work beautifully to create that “scrappy” textured look).
- Appliqué Fabrics:
- Light Blue/Sky Blue: For the chest, tummy, lower jaw, and outer eye patches.
- Dark Grey/Black: For the nose and inner eyes.
- White (or silver glitter/texture fabric): For the eye highlights.
- Fusible Web: (e.g., HeatnBond Lite or Steam-A-Seam 2) for securing the appliqué pieces.
- Backing & Batting: Sized to fit your finished quilt top.
- Binding Fabric: A striped or contrasting fabric (the black-and-white striped binding in the photo looks fantastic!).
- Thread: Black thread for the detail stitching, and matching blue threads for the appliqué edges.
- Basic Sewing Supplies: Rotary cutter, cutting mat, acrylic ruler, iron, sewing machine, and pins.
Step-by-Step Instructions
Phase 1: Piece the Checkerboard Background
Before building Stitch, you need to create his “world”—a gorgeous grid of alternating blue squares.
- Cut the Squares: Cut your background blue fabrics into equal squares.Size Guide: Cutting $5.5″ \times 5.5″$ squares will result in a finished $5″ \times 5″$ grid. You will need enough squares to make a grid roughly 14 squares wide by 20 squares long (depending on your desired quilt size).
- Arrange the Grid: Lay out your squares on a design wall or floor. Mix the different shades of blue to create a scrappy, balanced checkerboard pattern.
- Sew the Rows: Sew the squares together row by row using a standard 1/4-inch seam allowance.
- Press the Seams: Press the seams of even rows to the right, and odd rows to the left. This allows you to “nest” your seams for perfectly matching corners.
- Assemble the Quilt Top Background: Sew the rows together to complete your background panel. Press the entire panel flat.
Phase 2: Create and Prepare the Appliqué Templates
Because Stitch is large, his body parts will be appliquéd directly onto your completed checkerboard background.
- Draft Your Pattern: Draw or print your templates for Stitch’s main features to scale. You will need templates for:
- The lower face/jaw and chest/tummy piece (this can be one continuous light blue piece or split into two).
- The outer light-blue eye patches.
- The dark inner eyes.
- The tiny white eye highlights.
- The large central nose.
- The two front paws.
- Trace Onto Fusible Web: Trace these shapes onto the paper side of your fusible web. Remember to mirror the images if they are asymmetrical!
- Iron to Fabric: Roughly cut out the traced shapes (leave a small margin around the lines) and iron them onto the wrong side of your corresponding appliqué fabrics.
- Cut to Precision: Use sharp fabric scissors to cut exactly along the drawn lines. Peel off the paper backing.
Phase 3: Layer and Fuse Stitch to the Background
Now comes the magic—assembling Stitch layer by layer!
- Place the Base Layer: Position the large light-blue chest/tummy and jaw pieces on the lower half of your checkerboard background. Refer to your photo guide to center him perfectly.
- Position the Head Details:
- Place the outer light-blue eye patches onto the background.
- Layer the dark inner eyes on top of the blue patches.
- Place the white highlights on the inner eyes.
- Position the large dark grey nose in the center, overlapping the jaw line slightly.
- Position the Paws: Lay the two dark paw patches over the chest area as if he is holding his hands up.
- Fuse in Place: Once you are 100% happy with the placement, take your hot iron and press down firmly to activate the fusible web, securing all the pieces to the quilt top.
Phase 4: Stitch the Appliqué Edges & Add Details
To make sure your quilt stands up to washes, you must secure the edges of the fused pieces.
- Stitch the Edges: Using a sewing machine, stitch around the raw edges of every appliqué piece. You can use a tight zig-zag stitch, a decorative blanket stitch, or a straight raw-edge stitch close to the edge.
- Add Free-Motion or Embroidered Details:
- Use black thread to sew the curved mouth line across the light-blue jaw.
- Sew the small nostril shapes inside the nose.
- Add the hair tufts at the very top of his head and the chest fluff details.
- Stitch the curved claw lines on his paws to define his fingers.
Phase 5: Quilting and Finishing
- Make the Quilt Sandwich: Layer your backing fabric (face down), batting, and your finished Stitch quilt top (face up). Pin or spray baste the layers securely.
- Quilt the Piece: Quilt as desired. You can do simple “stitch in the ditch” quilting around the background squares to keep the focus on Stitch, or do free-motion quilting around the character to make him pop forward.
- Bind the Edges: Trim any excess batting and backing. Sew your striped binding around the edges to frame your masterpiece!
Pro-Tip for Your Readers: When sewing large character quilts, using a stabilizer on the back of your background fabric before sewing the appliqué pieces can prevent the fabric from puckering or stretching!