Create a beautiful handmade Christmas centerpiece with this festive crochet table runner pattern! Featuring an elegant ivory lace center, a rich red scalloped border, miniature Christmas stockings, dark green holly leaves, decorative berries, and delicate bows, this project brings a traditional holiday atmosphere to your dining room.
The design combines classic crochet lace with three-dimensional Christmas appliqués. The long, narrow shape makes it perfect for dining tables, kitchen tables, sideboards, holiday buffets, and festive displays.
This step-by-step tutorial explains how to crochet the main runner, create the decorative border, make tiny stockings and holly leaves, and assemble all the details into a coordinated Christmas decoration.
The pattern below is an original, photo-inspired interpretation rather than an exact reconstruction of the stitch chart in the reference photograph.
Project Details
- Project: Christmas crochet table runner
- Style: Traditional, vintage-inspired holiday decor
- Skill level: Intermediate
- Crochet terminology: US terms
- Construction: Flat lace panel with separately crocheted appliqués
- Suggested finished size: Approximately 14 × 60 inches (35 × 152 cm)
- Main colors: Ivory, Christmas red, forest green, and soft blush
- Optional accents: Gold thread and decorative berries
The finished dimensions will vary depending on your yarn, hook size, tension, and the number of lace repeats.
Materials and Supplies
Gather the following materials before starting.
Yarn
Choose cotton or mercerized cotton yarn for a defined lace pattern and a neat finish.
- Ivory or cream yarn: approximately 500–650 yards (460–595 m)
- Christmas red yarn: approximately 250–350 yards (230–320 m)
- Dark green yarn: approximately 100–150 yards (90–137 m)
- White yarn: approximately 50–75 yards (46–69 m)
- Blush or pale pink yarn: a small amount for bows
- Red yarn for berries: a small amount if using crocheted berries
These quantities are estimates for a medium-sized runner with decorative appliqués. Make a sample first to determine your actual yarn requirements.
Tools
- 3.0–3.5 mm crochet hook for the lace panel
- 2.5–3.0 mm crochet hook for the miniature stockings and leaves
- Yarn needle
- Scissors
- Stitch markers
- Rust-resistant blocking pins and a blocking mat
- Measuring tape
- Sewing needle and thread for optional beads
- Small gold or red decorative beads, optional
- Ribbon, optional
For a completely textile-based decoration, use crocheted berries and embroidered gold details instead of beads.
Crochet Abbreviations
This tutorial uses standard US crochet terminology.
- ch: Chain
- sl st: Slip stitch
- sc: Single crochet
- hdc: Half double crochet
- dc: Double crochet
- tr: Treble crochet
- inc: Increase
- dec: Decrease
- sp: Space
- sk: Skip
- st(s): Stitch(es)
- rep: Repeat
- FO: Fasten off
- RS: Right side
- WS: Wrong side
Special Stitches
Shell stitch: Work 5 dc into the same stitch or chain space.
Picot: Ch 3, then sl st into the first chain made.
Chain-space arch: A series of chains joined to the next stitch with a single crochet. These arches create the open texture of the lace.
Foundation ring: A small ring made with chains or a magic ring, used to begin circular motifs.
Part 1: Crochet the Ivory Lace Center
The ivory center is the main feature of this table runner. It should have an open, floral appearance, with repeating lace motifs running from one end to the other.
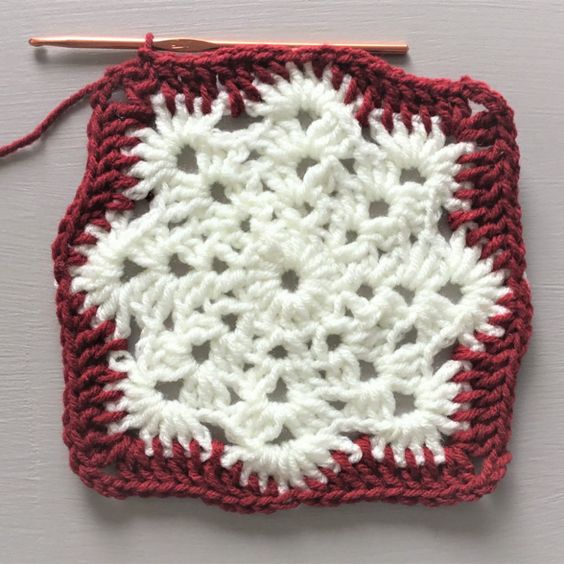
For this version, the center is constructed from individual square floral motifs joined into a long strip. This modular method makes it easier to maintain consistent dimensions and repair or replace individual sections if needed.
Step 1: Make the First Floral Motif
Using ivory yarn, ch 6 and join with a sl st to form a ring.
Round 1: Ch 3 (counts as the first dc), work 15 dc into the ring. Join with a sl st to the top of the beginning ch-3. (16 dc)
Round 2: Ch 4, dc in the same stitch. Ch 1, sk 1 st, dc in the next st, ch 1, dc in the same st. Repeat around, creating paired stitches and open spaces. Join with a sl st.
Round 3: Sl st into the first chain space. Ch 3, work 2 dc in the same space, ch 2, 3 dc in the same space. This creates the first corner shell.
Work sc in the next chain space, then 3 dc, ch 2, 3 dc in the following chain space around, spacing the larger shells evenly to create four corners.
Join with a sl st and FO.
The exact spacing of the corner shells may need a small adjustment depending on your tension. The important goal is a flat, symmetrical motif with four recognizable corners.
Step 2: Create the Open Lace Edges
Join ivory yarn to a corner chain space.
Round 4: Ch 3, work 2 dc in the same corner space, ch 2, 3 dc in the same space. Work a shell of 3 dc in the next suitable side space, ch 1, and continue along the side. At each corner, work 3 dc, ch 2, 3 dc.
Repeat along all four sides, using the same spacing on opposite sides.
Round 5: Sl st into the first corner space. Work 3 dc, ch 2, 3 dc in the corner. Along each side, work a repeating sequence of sc in the next chain space, ch 3, sk the next shell group, sc in the next chain space.
At each corner, maintain the larger shell to keep the motif square.
FO and weave in the ends.
Block the square gently, opening the chain spaces without stretching the stitches excessively.
Step 3: Make the Remaining Lace Motifs
Make enough matching motifs to form a long rectangular strip.
For a runner approximately 60 inches long, you may need around 8–10 motifs, depending on their blocked size and the joining method.
Before making all the pieces, block one motif and measure it. Multiply the measured length by the number of motifs, allowing for slight overlap or joining.
For example, if each blocked motif measures approximately 6 inches long, eight motifs will create a strip roughly 48 inches long before adding the end details and borders.
Keep all motifs the same size by using consistent yarn tension and the same hook.
Step 4: Join the Motifs
Arrange the motifs in one straight line with the right sides facing upward.
Join them with ivory yarn using a slip-stitch seam or a yarn needle.
For a crochet join:
- Place two motifs side by side.
- Insert the hook through corresponding loops along their edges.
- Work a sl st through both motifs.
- Continue along the edge, keeping the seam relaxed.
- Repeat until all motifs are connected.
Avoid pulling the joining yarn too tightly, as this can create puckering.
When all motifs are joined, lay the panel flat and check that the long edges remain straight.
Part 2: Add the Red Lace Border
The deep red edging creates contrast around the ivory center and gives the runner its festive appearance.
Join red yarn to any outer edge stitch.
Border Round 1
Ch 1 and work sc evenly around the entire runner.
Work 3 sc in each outer corner to help the fabric turn smoothly.
Along straight edges, distribute the stitches evenly. If the edge is made from chain arches, place stitches into the arches rather than forcing them into individual chain stitches.
Join with a sl st.
Border Round 2
Ch 3, work dc around the runner, placing 3 dc in each corner group.
Join with a sl st.
This round provides a stable foundation for the decorative edging.
Border Round 3: Red Shell Edging
Ch 1 and sc in the first stitch.
Sk 2 sts, work 5 dc in the next st, sk 2 sts, sc in the next st.
Repeat along the edge.
At the corners, adjust the spacing so the shell pattern turns without curling. You may need to skip fewer stitches or add an extra sc depending on the corner.
Join and FO.
The red shells should form a soft, scalloped edge rather than a tight or wavy border.
For a more pronounced vintage look, work a second red round of small shells or picots after the first edging has been blocked.
Part 3: Crochet the Mini Christmas Stockings
The miniature stockings are the most recognizable decorations in the reference design. Make them in Christmas red with white cuffs and contrasting toes.
The following pattern creates small flat stockings that can be sewn onto the runner.
Make approximately 16–20 stockings, depending on the length of the runner and the spacing you prefer.
Step 1: Crochet the Foot
Using red yarn, ch 7.
Row 1: Starting in the second ch from the hook, sc across. (6 sc)
Row 2: Ch 1, turn, sc across. (6 sc)
Rows 3–5: Repeat Row 2.
This creates the lower foot of the stocking.
Step 2: Shape the Toe
Row 6: Ch 1, turn, sc in the first 4 sts, leaving the last 2 sts unworked. (4 sc)
Row 7: Ch 1, turn, sc across. (4 sc)
Row 8: Ch 1, turn, sc in the first 3 sts, leaving the final stitch unworked. (3 sc)
FO.
The reduced rows create a gently tapered toe. For a more curved toe, use a yarn needle to round the outer edge during assembly.
Step 3: Make the Ankle
Join red yarn at the upper edge of the foot.
Ch 1 and work sc evenly across the top edge. Continue working short rows upward until the stocking reaches your desired height.
A small stocking will generally need approximately 4–6 additional rows, depending on yarn and tension.
Keep the sides as straight as possible.
Step 4: Create the Heel and Leg Shape
To suggest the heel, join red yarn near the back of the foot and work 2–3 sc into the side edge. Continue along the back edge and upward toward the leg.
If necessary, add one extra short row to make the upper section wider than the foot.
The finished stocking should resemble a small sock with a narrow ankle, wider upper section, and slightly curved toe.
Do not worry if the outline is not perfectly smooth at this stage; the cuff and embroidery will help define the finished shape.
Step 5: Add the White Cuff
Join white yarn at the top of the stocking.
Cuff Round 1: Ch 1 and work sc evenly around the opening. Join with a sl st.
Cuff Round 2: Ch 1, work sc in each stitch around. Join.
Cuff Round 3: Ch 1, work a small shell or picot edging around the top.
For a simple cuff, use a contrasting white band of 2–3 rows without additional decoration.
FO and weave in all ends.
Step 6: Add a White Toe Accent
Join white yarn at the toe.
Work a few small sc stitches across the front edge, or sew a tiny cream-colored patch onto the toe using a yarn needle.
Keep the accent small so the red stocking remains the main color.
Step 7: Embroider a Snowflake
Using white yarn or embroidery thread, create a small snowflake on the front of each stocking.
- Make one short vertical stitch.
- Add a horizontal stitch across its center.
- Add two short diagonal stitches.
- Add tiny branch stitches at the ends if desired.
Use a yarn needle and keep the embroidery centered.
Alternatively, embroider a small star, heart, or simple cross.
Repeat for every stocking.
Part 4: Crochet the Holly Leaves
The dark green holly leaves extend outward from the runner’s red border, creating a leafy Christmas garland effect.
Make enough leaves to form small clusters beside the stockings. A typical runner may need 24–36 leaves, depending on the arrangement.
Step 1: Make a Large Holly Leaf
Using dark green yarn, ch 13.
Starting in the second chain from the hook, work along the first side of the chain:
- 1 sl st
- 1 sc
- 1 hdc
- 2 dc
- 2 tr
- 2 dc
- 1 hdc
- 1 sc
- 1 sl st
At the end of the chain, work 3 sc into the final chain to create the tip.
Turn the work and crochet along the opposite side of the foundation chain, mirroring the stitch sequence.
Join with a sl st at the base.
FO, leaving a long tail for sewing.
Step 2: Add the Pointed Holly Edges
To create a more recognizable holly shape, join green yarn at the leaf edge.
Work small picots at selected points along both sides of the leaf:
Sc in the next edge stitch, ch 3, sl st in the first chain, sc in the next edge stitch.
Repeat along the outer edges, leaving small gaps between the points.
Fasten off and weave in the ends.
Gently flatten the leaf with your fingers.
Step 3: Make Smaller Leaves
For a smaller leaf, ch 9 and work a shortened version of the same stitch sequence.
Use sc, hdc, and dc to create a tapered shape, then add one or two picots on each side.
Make a mixture of large and small leaves for a more natural-looking arrangement.
Part 5: Crochet the Red Berries
The little red berry clusters add dimension and contrast to the green foliage.
You can use small crocheted berries or embroidered French knots.
Crocheted Berry Pattern
Using red yarn, make a magic ring.
Round 1: Work 6 sc into the ring. (6 sts)
Round 2: Work sc in each stitch around. (6 sts)
Round 3: Repeat 1 sc, dec twice. (4 sts)
Add a tiny amount of stuffing if desired.
FO, leaving a long tail.
Thread the yarn through the remaining stitches and pull closed.
Make three berries for each cluster.
Arrange three berries close together and sew them at their bases. Keep the cluster compact so it sits neatly between the holly leaves.
For a simpler alternative, use red embroidery thread to create small raised knots on the green leaf clusters.
Part 6: Make the Decorative Bows
The soft blush bows add a delicate contrast to the strong red, green, and ivory colors.
Make one small bow for each stocking.
Step 1: Crochet the Bow Center
Using blush yarn, ch 5.
Work sc across the chain.
Ch 1, turn, and work sc across for 2–3 rows.
FO, leaving a long tail.
Wrap the small strip around its center to form a bow shape, then sew the ends together.
Step 2: Shape the Bow
Use your fingers to create two loops on either side of the center.
Wrap the remaining yarn around the middle several times to define the bow.
Secure with a few stitches at the back.
For a more structured bow, make two small loops from narrow satin ribbon and stitch them to the crocheted center.
Step 3: Attach the Bow
Sew the bow near the top of each stocking, just above the white cuff.
Keep the bows aligned at approximately the same height.
If using ribbon, seal its cut ends according to the ribbon manufacturer’s instructions and keep all loose ends securely attached.
Part 7: Arrange the Stockings Along the Runner
Once the stockings, leaves, berries, and bows are ready, arrange them along the red border.
The reference design uses repeated decorations on both sides of the central lace panel.
Step 1: Plan the Layout
Lay the runner flat on a large surface.
Place the stockings at regular intervals along the long edges.
For a runner with 8–10 main lace motifs, you might begin with 8–9 stockings on each side. Adjust the number to match the actual finished length.
Place one stocking beside each major lace section or at regular intervals between the motifs.
Step 2: Position the Holly Leaves
Place one small cluster of holly leaves near each stocking.
Angle the leaves outward so they extend beyond the red border.
Alternate the direction of the leaves to create a balanced, garland-like effect.
Avoid arranging every leaf at exactly the same angle; slight variations make the decoration appear more natural.
Step 3: Add the Berry Clusters
Place a small berry cluster between the holly leaves.
Keep the red berries close together so they stand out against the green yarn.
Alternate berry clusters with the stocking decorations if the border becomes too crowded.
Step 4: Pin Everything in Place
Before sewing, pin the stockings, leaves, and berries temporarily.
Measure the distance between decorations on one side, then repeat the arrangement on the opposite side.
Take a photograph of the layout before removing any pins. This makes it easier to maintain symmetry while sewing.
Part 8: Sew the Decorations to the Runner
Use matching yarn and a yarn needle to attach each component securely.
Attaching the Stockings
Position the top of each stocking close to the red scalloped border.
Sew through the upper edge and several stitches of the runner’s border.
Make multiple small stitches so the stocking does not twist or pull away from the lace.
Leave the lower portion of the stocking slightly free if you want a dimensional appearance.
Attaching the Holly Leaves
Sew each leaf through its central foundation line.
Do not stitch down every pointed edge. Leaving the tips free gives the leaves a more natural, dimensional shape.
Attaching the Berry Clusters
Sew each cluster securely at its base.
Use matching red yarn and make several passes through the center of the cluster.
If using beads instead of crocheted berries, attach them with strong sewing thread and check that they cannot come loose. For households with small children or pets, embroidered berries are a safer decorative alternative.
Attaching the Bows
Sew the bows to the stocking tops or directly onto the holly clusters.
Keep the attachment stitches hidden behind the center of each bow.
Check that all the decorations face the correct direction when the runner is laid flat.
Part 9: Crochet the Large End Bows
The large red bows at the ends of the runner give the finished piece a dramatic, festive appearance.
Make two matching bows.
Step 1: Crochet the Bow Loops
Using red yarn, ch 24.
Work dc across the chain.
Ch 2, turn, and work dc across for 4–5 rows.
FO.
Fold the strip into two loops and overlap the ends slightly to form a bow shape.
Sew the overlapping ends together.
Repeat to make the second loop.
Step 2: Make the Center Band
Using red yarn, ch 8.
Work sc across for 4–5 rows.
FO and wrap the strip around the center of the bow.
Sew the ends together at the back.
Step 3: Create the Bow Tails
Ch 30 using red yarn.
Work sc along the chain for a narrow ribbon-like strip.
Make two tails.
For a pointed end, work 3 sc into the final stitch or shape the end with a yarn needle after fastening off.
Add a narrow line of gold embroidery or gold-colored yarn along the outer edges for a decorative finish.
Step 4: Add Gold Details
Use gold yarn to embroider small chain stitches around the bow edges.
Alternatively, sew a thin gold ribbon around the loops.
Keep the gold accents delicate so they complement the red without overwhelming the design.
Step 5: Attach the End Bows
Position one large bow at each short end of the runner.
Center the bow over the ivory lace panel and red border.
Sew it securely through the back of the bow and into the runner.
Add a small cluster of green leaves and red berries underneath each bow to complete the holiday arrangement.
Part 10: Finishing and Blocking
Blocking is especially important for a long lace table runner because it helps the center lie flat and keeps the edges even.
Step 1: Prepare the Runner
Weave in all loose ends.
Check the joins between the lace motifs and reinforce any weak seams.
Make sure the stockings and holly leaves are securely attached.
Step 2: Wet Block the Lace
Follow the care instructions for your yarn.
If the yarn is suitable for wet blocking, gently dampen the runner and press out excess water without twisting.
Lay it flat on a blocking mat.
Step 3: Shape the Runner
Use a measuring tape to straighten the long edges.
Pin the center panel into a neat rectangle.
Shape each lace motif so its corners and chain spaces open evenly.
Adjust the red scallops individually to create a consistent border.
Step 4: Allow It to Dry
Let the runner dry completely before removing the pins.
Avoid placing heavy objects on the decorative bows, stockings, or berry clusters while the piece is drying.
Once dry, inspect the runner from both sides and trim any remaining loose ends.
Customizing the Pattern
This design can be adapted to suit different tables, color schemes, and Christmas decorating styles.
Traditional Christmas Colors
Use ivory for the lace, deep red for the border and stockings, forest green for the holly, and white for the cuffs.
This combination creates the classic holiday appearance shown in the inspiration photograph.
Vintage Christmas Colors
Choose burgundy, antique cream, muted sage green, and dusty pink.
Add delicate gold embroidery to the bows for an heirloom-inspired finish.
Minimalist Holiday Decor
Use cream for the main panel, muted red for the edging, and a soft olive green for the leaves.
Reduce the number of berries and bows for a simpler, more understated table runner.
Adjusting the Length
To make the runner longer, add more lace motifs to the center strip and increase the number of stocking decorations accordingly.
To make a shorter runner, use fewer motifs and space the stockings evenly along the finished edges.
Always complete and measure one motif before calculating the final dimensions.
Troubleshooting Tips
The lace panel curls at the edges.
Your chain spaces or corner stitches may be too tight. Try a slightly larger hook or add the appropriate number of corner stitches.
The runner looks wavy.
Too many stitches along the border can cause the edges to flare. Reduce the stitch count slightly and check the piece after each round.
The stockings curl or twist.
Check that your rows are straight and that the stocking is not being pulled by its attachment stitches. Blocking the pieces before assembly can help.
The holly leaves look rounded rather than pointed.
Use a firmer tension and emphasize the picots at the outer edges. A smaller hook may help create a more defined leaf shape.
The decorative bows look uneven.
Make all bow loops from strips with the same stitch count and row count. Measure each finished strip before assembly.
The runner does not lie flat after assembly.
Check the joins between the lace motifs and the placement of the appliqués. Blocking the main panel before adding heavy decorations often produces a better result.
Care Instructions
Handwashing is generally the gentlest option for a heavily decorated crochet runner.
Use cool water and a mild detergent suitable for the yarn.
Do not wring the fabric. Press out excess water gently and lay the runner flat to dry.
Avoid pulling on the stockings, bows, or holly leaves when handling the runner.
Store the finished piece in a clean, dry place between holiday seasons. Rolling it loosely or folding it between the lace motifs can help prevent deep creases.
Final Thoughts
This Christmas crochet table runner brings together delicate lace, miniature stockings, leafy holly, bright berries, and decorative bows in one festive handmade project.
The combination of ivory and red creates a beautiful contrast, while the green foliage and blush bows add texture and warmth. Although the project involves several individual components, making them in batches can help you maintain consistent sizing and work more efficiently.
Take your time with the lace panel, arrange the decorations before sewing, and block the finished runner carefully for the best results.
Whether displayed on a dining table, a sideboard, or a holiday buffet, this handmade centerpiece can become a special part of your Christmas decorating tradition.
Happy crocheting, and Merry Christmas!